CMSC216 Project 3: Assembly Coding and Debugging
- Due: 11:59pm Mon 30-Mar-2026 on Gradescope
- Approximately 2.0% of total grade
- Submit to Gradescope
- Free Collaboration is allowed on projects. See the Syllabus for details.
CODE/TEST DISTRIBUTION: p3-code.zip
VIDEO OVERVIEW: https://umd.instructure.com/courses/1398391/pages/week-07-videos
CHANGELOG:
- Tue Mar 24 09:42:10 AM EDT 2026
- A student reported a minor bug in
Puzzlebin Phase06 which created difficulty indexing the 0th element
of an array with the input for the phase. This bug has been
repaired. It should only affect a very small number of students but
if students wish to ensure they don't suffer from it, they can run
make updateto get the updated version of Puzzlebin which fixes the bug.
1 Introduction
This project will feel somewhat familiar in that it is nearly identical to the preceding one. The major change is that everything is at the assembly level on a coding problem and puzzle-solving problem:
- Problem 1 re-works the Thermometer functions from the previous project in x86-64 Assembly rather than C
- Problem 2 involves analyzing a binary executable to provide it with the correct input to "solve" the executable much like the previous project's Puzzlebox problem
Working with assembly will get you a much more acquainted with the low-level details of the x86-64 platform and give you a greater appreciation for "high-level" languages (like C).
2 Download Code and Setup
Download the code pack linked at the top of the page. Unzip this which will create a project folder. Create new files in this folder. Ultimately you will re-zip this folder to submit it.
| File | State | Notes |
|---|---|---|
thermo_update_asm.s |
CREATE | Problem 1 Assembly functions, re-code C in x86-64, main file to edit for problem 1 |
thermo_update.c |
CREATE | Problem 1 C functions, COPY from Project 2 or see a staff member to discuss |
thermo.h |
Provided | Problem 1 header file |
thermo_main.c |
Provided | Problem 1 main() function |
thermo_sim.c |
Provided | Problem 1 thermometer simulator functions |
test_thermo_update.c |
Testing | Problem 1 testing program for thermo_update_asm.c |
test_thermo_update_asm.s |
Testing | Problem 1 testing program for thermo_update_asm.c |
test_thermo.org |
Testing | Problem 1 testing data file |
puzzlebin |
Provided | Problem 2 Executable for debugging |
input.txt |
EDIT | Problem 2 Input for puzzlebox, fill this in |
Makefile |
Provided | Build file |
testy |
Testing | Test running script |
gradescope-submit |
Provided | Allows submission from the command line |
3 Problem 1: Thermometer Assembly Functions
The functions in this problem are identical to a previous assignment in which code to support digital thermometer was written. These functions are:
int set_temp_from_ports(temp_t *temp)- Read global variables corresponding to sensor and mode
information and set the fields of a
temp_tstructure accordingly. int set_display_from_temp(temp_t temp, int *display)- Given a
temp_tstruct, reset and alter the bits pointed to bydisplayto cause a proper temperature display. int thermo_update()- Update global
THERMO_DISPLAY_PORTusing the above functions.
The big change in this iteration will be that the functions must be written in x86-64 assembly code. As C functions each of these is short, 30-50 lines maximum. The assembly versions will be somewhat longer as each C line typically needs 1-4 lines of assembly code to implement fully. Coding these functions in assembly give you real experience writing working assembly code and working with it in combination with C.
The code setup and tests are identical for this problem as for the previous C version of the problem. Refer to original Thermometer Problem description for a broad overview of the thermometer simulator and files associated with it.
3.1 Hand-Code Your Assembly
As discussed in class, one can generate assembly code from C code with appropriate compiler flags. This can be useful for getting oriented and as a beginning to the code your assembly versions of the functions. However, this exercise is about writing assembly yourself to gain a deeper understanding of it.
Code that is strong signs of being compiler-generated with no hand coding will receive significant deductions. Code that does not follow modern x86-64 conventions discussed in the course will be heavily penalized.
If you are using LLMs in your workflow, keep in mind that they have been trained on quite a bit of compiler-generated assembly so may follow dated conventions. As ever, make sure you understand the code you submit as your own work and ensure that it follows the style and conventions laid out in lecture. Failure to do so will lead to loss of credit.
Base your Assembly code on your C code
The files to be submitted for this problem include
thermo_update.c: C version of the functionsthermo_update_asm.s: Assembly version of the functions
Graders may examine these for a correspondence between to the algorithm used in the C version to the Assembly version. Compiler generated assembly often does significant re-arrangements of assembly code with many intermediate labels that hand-written code will not have.
If you were not able to complete the C functions for Project 2 or were not confident in your solutions, see a course staff member who will help you get them up and running quickly.
Annotate your Assembly Thoroughly
Comment your assembly code A LOT. While good C code can be quite self-explanatory with descriptive variable names and clear control structures, assembly is rarely so easy to understand. Include clear commentary on your assembly. This should include
- Subdividing functions into smaller blocks with comments describing what the blocks accomplish.
- Descriptions of which "variables" from the C side are held in which registers.
- Descriptions of most assembly lines and their effect on the variables held in the registers.
- Descriptions of any data such as bitmasks stored in the assembly code.
- Use informative label names like
.ROUNDING_UPto convey further meaning about what goals certain positions in code are accomplishing.
Use Division
While it is a slow instruction that is cumbersome to set up, using
idivX division instruction is the most human-readable means to
compute several results needed in the required functions. Compiler
generated code uses many tricks to avoid integer division so a lack of
idivX instructions along this line will be a clear sign little
effort has been put into the assembly code.
3.2 General Cautions and Assembly Hints
- Get your editor set up to make coding assembly easier. If you are using VS Code, the following video will show you how to install an extension to do syntax highlighting and block comment/uncomment operations in assembly: https://youtu.be/AgmXUFOEgIw
- Be disciplined about your register use: comment what "variables" are in which registers as it is up to you to keep track. The #1 advice from past students to future students is "Comment the Crap out of your assembly code" on this project.
Be Careful with constants: forgetting a
$in constants will lead to a bare, absolute memory address which will likely segfault your program. Contrast:movq $0,%rax # rax = 0 movq 0, %rax # rax = *(0): segfault # bare 0 is memory address 0 - out of boundsRunning your programs, assembly code included, in Valgrind can help to identify these problems. In Valgrind output, look for a line number in the assembly code which has absolute memory addresses or a register that has an invalid address.
Recognize that in x86-64 function parameters are passed in registers for up to 6 arguments. These are arranged as follows
rdi / edi / di(arg 1)rsi / esi / si(arg 2)rdx / edx / dx(arg 3)rcx / ecx / cx(arg 4)r8 / r8d / r8w(arg 5)r9 / r9d / r9w(arg 6)
and the specific register corresponds to how argument sizes (64 bit args in
rdi, 32 bit inedi, etc). The functions you will write have few arguments so they will all be in registers.Use registers sparingly. The following registers (64-bit names) are "scratch" registers or "caller save." Functions may alter them freely (though some may contain function arguments).
rax rcx rdx rdi rsi r8 r9 r10 r11 # Caller save registers
No special actions need to be taken at the end of the function regarding these registers except that
raxshould contain the function return value.Remaining registers are "callee save": if used, their original values must be restored before returning from the function.
rbx rbp r12 r13 r14 r15 # Callee save registers
This is typically done by pushing the callee registers to be used on the stack, using them, them popping them off the stack in reverse order. Avoid this if you can (and you probably can in our case).
- Be careful to adjust the stack pointer using
pushX/popXorsubq/addq. Keep in mind the stack must be aligned to 16-byte boundaries for function calls to work correctly. Above all, don't treatrspas a general purpose register. - Note carefully which function use which conventions for struct arguments; e.g. pointers to structs VERSUS actual structs. Use appropriate assembly techniques to access fields each (they are not the same).
To access a global variable and copy it into a register, use the following assembly syntax
movw GLOB_VAR_NAME(%rip), %cx # copy global var to reg cx
Many functions access the global PORT variables but only a few change those variables.
- Use comparisons and jumps a separate sections of code that are clearly marked as "error" or "out of bounds" if you detect bad arguments to functions.
- When required, used bit shifting and masking to efficiently perform division by powers of two and check for remainders if rounding is required.
- Make use of division to extract digits in base 10 if the situation
requires it. Keep in mind that the
idivXinstruction must haverax/eax/axas the dividend,rdxsign-extended out viacwtl / cltq / cqtoinstructions. Any register can contain thedivisor. After the instruction,rax/eax/axwill hold thequotientandrdx/edx/dxthe remainder. With cleverness, you'll only need to do a couple divisions. - Use shifts and ORs to combine the digit bit patterns to create the final display bit pattern.
The final function in the problem requires the previous functions to be called to to create the struct and manipulate the bits of the display. Calling a function requires that the stack be aligned to 16-bytes; there is always an 8-byte quantity on the stack (previous value of the
rspstack pointer). This means the stack must be extended with asubqinstruction before any calls. A typical sequence issubq $<NUM>,%rsp # adjust the stack pointer to make space for local # values AND align to a 16-byte boundary call some_func # stack aligned, call function ## return val from func in rax or eax call other_func # stack still aligned, call other function ## return val from func in rax or eax addq $<NUM>,%rsp # restore the stack pointer to its original valueNOTE: the specific value for
<NUM>is dependent on the situation. Common total adjustments are 8 bytes, 24 bytes, and 40 bytes. Pick one that fits the situation here: how much space for local variables is needed in the function. Most implementations will need space for a local struct so knowing the total size required for it is a good start.- Structs that are stored in the stack can be "packed" into
registers by moving their fields into those registers. For small
structs, a single
movq / movl / movwmay be enough to move the entire struct into an argument register. For larger structs, several moves may be required. - When manipulating the stack, use the modern convention of relying on the stack pointer only with positive offsets for local data. Use the base pointer only as a callee save regiser.
3.3 Register Reference Diagram
For reference, here is a picture that appears in the lecture slides that summarizes the names and special uses for the registers in x86-64.
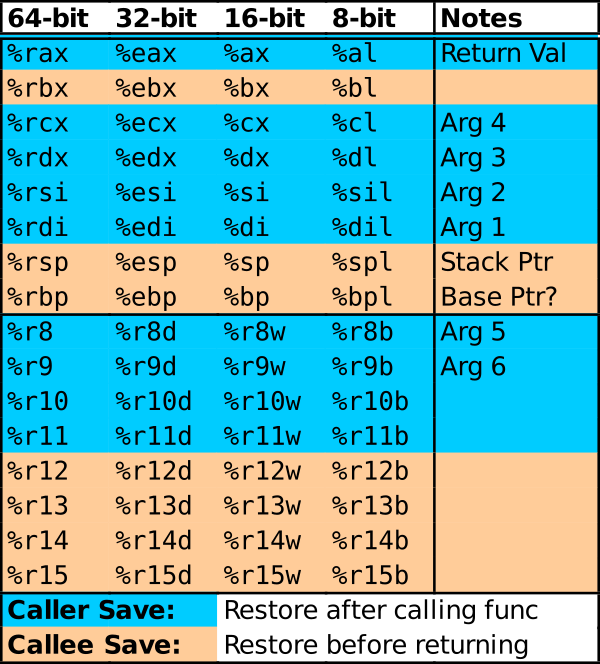
Figure 1: Summary of general purpose register usages in x86-64.
3.4 Structure of thermo_update_asm.s
Below is a rough outline of the structure of thermo_updat_asm.s.
Consider copying this file as you get started and commenting parts of
it out as needed.
### Begin with functions/executable code in the assmebly file via '.text' directive
.text
.global  set_temp_from_ports

## ENTRY POINT FOR REQUIRED FUNCTION
set_temp_from_ports:
        ## assembly instructions here

        ## a useful technique for this problem
        movX    SOME_GLOBAL_VAR(%rip), %reg
        # load global variable into register
        # Check the C type of the variable
        #    char / short / int / long
        # and use one of
        #    movb / movw / movl / movq
        # and appropriately sized destination register

        ## DON'T FORGET TO RETURN FROM FUNCTIONS

### Change to definint semi-global variables used with the next function
### via the '.data' directive
.data

my_int:                         # declare location an single integer named 'my_int'
        .int 1234               # value 1234

other_int:                      # declare another int accessible via name 'other_int'
        .int 0b0101             # binary value as per C

my_array:                       # declare multiple ints sequentially starting at location
        .int 20                 # 'my_array' for an array. Each are spaced 4 bytes from the
        .int 0x00014            # next and can be given values using the same prefixes as
        .int 0b11110            # are understood by gcc.


## WARNING: Don't forget to switch back to .text as below
## Otherwise you may get weird permission errors when executing

.text
.global  set_display_from_temp

## ENTRY POINT FOR REQUIRED FUNCTION
set_display_from_temp:
        ## assembly instructions here

	## two useful techniques for this problem
        movl    my_int(%rip),%eax    # load my_int into register eax
        leaq    my_array(%rip),%rdx  # load pointer to beginning of my_array into rdx


.text
.global thermo_update

## ENTRY POINT FOR REQUIRED FUNCTION
thermo_update:
	## assembly instructions here
3.5 Documentation of Functions
Below is a repeat of the documentation from project 2 on the expected behavior of the required functions.
// thermo_update.c: functions that read the thermometer temperature
// sensor, convert its value to degrees Celsius or Fahrenheit, and
// adjusts the display to show the temperature.

#include "thermo.h"

int set_temp_from_ports(temp_t *temp);
// Uses the two global variables (ports) THERMO_SENSOR_PORT and
// THERMO_STATUS_PORT to set the fields of `temp`. If
// THERMO_SENSOR_PORT is negative or above its maximum trusted value
// (associated with +45.0 deg C), this function sets the
// tenths_degrees to 0 and the temp_mode to 3 for `temp` before
// returning 1.  Otherwise, converts the sensor value to deg C using
// shift operations.  Further converts to deg F if indicated from
// THERMO_STATUS_PORT. Sets the fields of `temp` to appropriate
// values. `temp_mode` is 1 for Celsius, and 2 for Fahrenheit. Returns
// 0 on success. This function DOES NOT modify any global variables
// but may access them.
//
// CONSTRAINT: Uses only integer operations. No floating point
// operations are used as the target machine does not have a FPU. Does
// not use any math functions such as abs().

int set_display_from_temp(temp_t temp, int *display);
// Alters the bits of integer pointed to by display to reflect the
// temperature in struct arg temp.  If temp has a temperature value
// that is below minimum or above maximum temperature allowable or if
// the temp_mode is not Celsius or Fahrenheit, sets the display to
// read "ERR" and returns 1. Otherwise, calculates each digit of the
// temperature and changes bits at display to show the temperature
// according to the pattern for each digit.  This function DOES NOT
// directly access or modify any PORTS through global variables.  If
// parameters like `display` happen to point at a global memory
// location, then global data will change but the name
// `THERMO_DISPLAY_PORT` and other port variables should not be used.
//
// CONSTRAINT: Uses only integer operations. No floating point
// operations are used as the target machine does not have a FPU. Does
// not use any math functions such as abs().

int thermo_update();
// Called to update the thermometer display.  Makes use of
// set_temp_from_ports() and set_display_from_temp() to access
// temperature sensor then set the display. Always sets the display
// even if the other functions returns an error. If both functions
// complete successfully and return 0, this function returns 0. If
// either function returns non-zero values due to problems, this
// function returns 1 to indicate a problem.
//
// CONSTRAINT: Does not allocate any heap memory as malloc() is NOT
// available on the target microcontroller.  Uses stack and global
// memory only.
//
// CONSTRAINT: Must honor conventions for return value (0 for success,
// 1 for errors in other functions) even if test cases do not evaluate
// all possibilities for this.
3.6 Accessing Struct Fields in Assembly
Accessing struct fields in C involves use of either the dot (.) or
arrow (->) field access operators depending on whether the struct is
locally stored (an "actual struct") or is available via its memory
location (a "pointer to a struct"). In assembly, different techniques
are also required. These are demonstrated in a recent Lab and
students wanting a quick overview should review that lab. The
provided header file has tables of where the struct fields for the
required data types are stored. These are show below for quick
reference:
// Breaks temperature down into constituent parts
typedef struct{
  short tenths_degrees;         // actual temp in tenths of degrees
  char temp_mode;               // 1 for celsius, 2 for fahrenheit, 3 for error
} temp_t;

// Accessing fields via a thermo_t * pointer
// |------------------------+---------+-------------+-------------------|
// |                        |         | Destination | Assembly          |
// | C Field Access         | Offset  | Size        | Assign 5 to field |
// |------------------------+---------+-------------+-------------------|
// | thermo->tenths_degrees | 0 bytes | 2 bytes     | movw $5, 0(%reg)  |
// | thermo->temp_mode      | 2 bytes | 1 bytes     | movb $5, 2(%reg)  |
// |------------------------+---------+-------------+-------------------|
//
// Accessing fields via a thermo_t packed struct
// |-----------------------+--------+-------------+---------|
// |                       |   Bits | Shift       |         |
// | C Field Access        | in reg | Required    | Size    |
// |-----------------------+--------+-------------+---------|
// | thermo.tenths_degrees |   0-15 | None        | 2 bytes |
// | thermo.temp_mode      |  16-23 | Right by 16 | 1 byte  |
// |-----------------------+--------+-------------+---------|
3.7 Notes on Partial Credit
Partial credit will be awarded in Manual Inspection for code that
looks functional but did not pass tests. However, keep in mind that
tests for thermo_update() rely on the previous 2 functions working
correctly and thermo_main requires all functions to work correctly in
conjunction. There is no partial credit available for these Automated
Tests even if they may work but the preceding functions do not which
causes tests to fail.
4 Problem 2: Puzzlebin
4.1 Overview
| GDB Quick Guide/Assembly | https://kauffman77.github.io/tutorials/gdb.html#gdb-assembly |
The nature of this problem is similar to the previous project's
puzzlebox: there is a program called puzzlebin which expects
certain inputs from a parameter file as input. If the inputs are
"correct", a phase will be "passed" earning points and allowing access
to a subsequent phases. The major change is that puzzlebin is in
binary so must be debugged in assembly. The GDB guide above has a
special section on debugging binaries which is worth reading. The
typical startup regime is:
>> gdb -tui puzzlebin
(gdb) set args input.txt      # set the command line arguments
(gdb) layout asm              # show disassembled instructions
(gdb) layout regs             # show the register file
(gdb) break phase01           # break at the start of the first phase01
(gdb) run                     # get cracking
Below is a summary of useful information concerning the puzzlebin.
- Input File
- Data for input should be placed in the
input.txtfile. The first value in this file will be the userID (first part of your UMD email address) which is 8 or fewer characters. - UserID Randomization
- Each phase has some randomization based on the UserID so that the specific answers of an one students will not necessarily work for another student.
- One Phase Input per Line
- Place the input for each phase on its own line. Some input phases read a whole line and then dissect it for individual data. Putting each input on its own line ensures you won't confuse the input processing.
- Passing Phases Earns Points
- As with the earlier
puzzlebox, points for this problem are earned based on how many phases are completed. Each phase that is completed will earn points. - Use GDB to work with Puzzlebin
- The debugger is the best tool to work with running the given program. It may be tempting to try to brute force the puzzlebin by trying many possible inputs but in most cases, a little exploration will suffice to solve most phases.
- The input line "SKIP" will skip a phase with a small penalty
- Students
woefully stuck on a phase may skip it to the next phase with the
input line
SKIP. Be aware that this applies a small penalty to the overall score AND changes the state of the random number generator so that if you revisit an earlier skipped phase, answers to later phases may change.
4.2 Permission Denied Errors
In some cases, the process of zipping an executable like puzzlebin
then unzipping it leads to the permissions on it being set
incorrectly. Below is a common permissions error and how to fix it by
changing the permissions on puzzlebin.
>> ./puzzlebin input.txt
bash: ./puzzlebin: Permission denied

# Permission error on puzzlebin: it is not set to be executable. The
# fix is:

>> chmod u+x puzzlebin
# Manually add the execute 'x' permission
# OR
>> make
chmod u+x puzzlebin
# use the provided Makefile to run that command

>> ./puzzlebin input.txt
========================================
Puzzlebin (release Tue 10-Oct-2024)
'YOUR_DIRECTORY_ID' is a userID and must be max 8 characters
# Now running normally albeit with the need to modify the input file
4.3 Puzzlebin Scoring grading 40
Scoring is done according to the following table.
| Pts | Phase | Notes |
|---|---|---|
| 5 | Phase 1 | |
| 5 | Phase 2 | |
| 7 | Phase 3 | |
| 8 | Phase 4 | |
| 7 | Phase 5 | |
| 8 | Phase 6 | |
| 10 | Phase 7 | Not Required |
| 10 | ??? | Additional Makeup credit if you can find it |
| -1 | SKIP | Penalty for using SKIP to bypass a phase |
| 40 | 60 Max | 40 point for full credit, 20 MAKEUP Credit available |
4.4 Advice and Hints
Most of the time you should run
puzzlebiningdbas in>> gdb -tui ./puzzlebin
Refer to the Quick Guide to GDB if you have forgotten how to use
gdband pay particular attention to the sections on debugging assembly.- Most phases process input via calls to
scanf()-style functions. Quick insight to the expected input for a phase comes from analyzing the format strings like"%d %d"and"%s %f %d"to those calls. Figure out how to do this early so you can determine the quantity and types of input to each phase. - It is worthwhile to look at the Failure Messages when a phase is not
going to be passed. These are passed to the
failure()function: printing them out may give you some hints. - Make use of other tools to analyze puzzlebin aside from the
debugger. Some of these like
stringsare described at the end of the Quick Guide to GDB. They will allow you to search for "interesting" data in the executablepuzzlebin. - Disassemble the executable to look at its entire source assembly code
as a text file. The Quick Guide to GDB shows how to use
objdumpto do this. Looking at the whole source code reveals that one cannot hide secrets easily in programs. - Feel free to do some internet research. There is a well-known "Binary Bomb Lab" assignment by Bryant and O'Hallaron, our textbook authors, that inspired Puzzlebin. It has a long history and there are some useful guides out there that can help you through rough patches. Keep in mind that your code will differ from any online tutorials BUT the techniques to defuse it may be similar to what is required to solve puzzles.
4.5 Compatibility
puzzlebin is a binary executable file and these are always a bit
flaky to distribute as is. It has been tested on GRACE and is know to
run normally there and is likely to run normally on most Linux
systems. If you see strange behavior on a different Linux platform
such as segmentation faults, revert to working on GRACE to for
immediate relief but also email Prof. Kauffman resolving
incompatibilities is of interest.
5 Grading Criteria
5.1 Points by Section
The following criteria will be checked. Some are Automated and
available during development via command like make test while others
are done Manually by graders after submission.
| Weight | Criteria |
|---|---|
| AUTOMATED TESTS | |
| 20 | make test-prob1 runs 40 tests for correctness for thermo_update_asm.s, 0.5 points per test |
| 40 | make test-prob2 which runs puzzlebin input.txt, 20 MAKEUP credit points available for Phase07 and beyond |
| 60 | SUBTOTAL |
| MANUAL INSPECTION | |
| 30 | PROBLEM 1 General Criteria for all Functions in thermo_update_asm.s |
| Clear signs of hand-crafted assembly are present. | |
| Detailed documentation/comments are provided showing the algorithm used in the assembly | |
| High-level variables and registers they occupy are described. | |
| Error checking on the input values is done with clear "error" sections and labels | |
| Modern assembly conventions followed such as use of only the stack pointer to access stack variables and | |
| RIP-relative addressing to access global variables | |
| 15 | PROBLEM 1 Specific Criteria for select functions |
set_temp_from_ports() |
|
| Remainders from the division by 32 are obtained through bitwise-AND on the low-order bits. | |
| Division is used to compute Fahrenheit temperature conversions. | |
set_display_from_temp() |
|
| There is a clearly documented global data section setting up useful tables of bit patterns for digits | |
| Division is used to compute quotients and remainders to determine individual digits | |
thermo_update() |
|
| The stack is extended to create space for local variables that must be passed by address and the restored before returning | |
| The stack is correctly aligned to a 16-byte boundary to be compatible with function calls | |
| Function calls to the earlier two functions are made with arguments passed in appropriate registers | |
| The return value for the first function call is retained across the second function call in a callee save register or the stack | |
PROBLEM 2 puzzlebin: No manual inspection criteria |
|
| 45 | SUBTOTAL |
WORK_DISCLOSURE.txt |
|
| Loss of up to 10% of project credit for failure to complete and type signature in work disclosure text file. |
NOTE: Passing all tests and earning all manual inspection criteria
will earn up to 5 Points of Project MAKEUP Credit which will offset
past and future loss of credit on projects. Passing additional
portions of puzzlebin may earn up to 20 points of Project MAKEUP
Credit.
5.2 Work Disclosure
In conjunction with the Free Collaboration policy for projects, all
submissions must include a WORK_DISCLOSURE.txt file. This document
outlines the resources that were utilized to complete the
project. Each significant resource, be it course staff member, fellow
student, website, textbook, AI, or other item should be named with at
least a sentence describing how that item influenced the submission.
The rough format of these disclosures is provided in the template
WORK_DISCLOSURE.txt file that is part of the project. This document
will be checked for reasonable completeness by staff during Manual
Inspection. The provided template document is below and should be
edited and included in the project submission.
                           _________________

                            WORK DISCLOSURE
                           _________________


(A) HUMAN COLLABORATORS
=======================

  Aside from the person submitting this assignment, the following people
  contributed ideas and discussion to the completion of this work
  INCLUDING course staff members. Write NONE if no collaborators were
  involved.
  - Person 1 <person1@email.com> helped understand Problem X and the
    meaning of...
  - Person 2 <person2@email.com> helped debug Code for Problem Y...
  - etc.


(B) RESOURCE UTILIZATION
========================

  The following resources such as websites, course notes, artificial
  intelligence tools (LLMs/ChatBots/etc.) were utilized in the
  completion of this work. Include course materials such as textbooks
  and lecture slides as well. (Write NONE if no resources were used
  [which would be hard to believe]).
  - Resource 1 is here <https://some.resource.org/useful_stuff.html> and
    provided help for Problem Z to understand...
  - Resource 2 is the book "C Code for Dummies" by Boo Kauthor with
    chapter 8 helping a lot with the malloc()/free() usage on Problem W
  - Resource 3 is here <https://airegurgitator.com> and provided AI
    refinements for the algorithm used on problem Q and also helped
    debug code for Problem N.
  - etc.


(C) ADHERENCE TO THE PRIME DIRECTIVE
====================================

  PRIME DIRECTIVE: Be able to explain your own work including assignment
  answers, program code, and exam solutions. The work you submit should
  be the product of your own effort and reflect your personal
  understanding. (See the course syllabus for more information.)

  I submit this work in accordance with the PRIME DIRECTIVE. I affirm
  that I can explain the code and answers within as I created them and
  they reflect my personal understanding.

  Signed,

  <REPLACE WITH SUBMITTER NAME>
6 Assignment Submission
6.1 Submit to Gradescope
Refer to the Project 1 instructions and adapt them for details of how to submit to Gradescope. In summary they are
- Command Line Submission
- Type
make submitto create a zip file and upload it to Gradescope; enter your login information when prompted. - Manual Submission
- Type
make zipto createpX-complete.zip, transfer this file to a local device, then upload it to the appropriate assignment on Gradescope via the sites web interface.
6.2 Late Policies
You may wish to review the policy on late project submission which will cost 1 Engagement Point per day late. No projects will be accepted more than 48 hours after the deadline.
https://www.cs.umd.edu/~profk/216/syllabus.html#late-submission